A challenging problem we solve for you
Chromebooks are worthy laptop alternatives. The battery life of the average Chromebook is amazing, so is the duality of the software—you can run both Android and Linux apps. Unfortunately, despite the durability and stability of Chromebooks, there are times when the devices fail to work correctly.
It’s always easier to fix problems with Chromebooks when they’re active or turned on. On the other hand, diagnosing issues preventing your Chromebook from turning on can be pretty challenging. But it’s fixable. In this guide, we’ll cover five things to try if your Chromebook is not turning on.
Table of Contents
The troubleshooting techniques in this guide apply to all Chromebooks, irrespective of brand name, model, and specification.
Note: If a new Chromebook won’t turn on or charge out-of-the-box, you should contact the vendor or return the device immediately. It’s possible that the Chromebook is a defective unit.
1. Remove and Reinsert the Battery
Although the batteries in new-generation Chromebooks are often built-in and non-detachable, older Chromebooks had removable batteries. If the problematic Chromebook has a detachable battery, remove the battery and plug it back in. If it still won’t turn on, remove the battery again and make sure there isn’t any foreign material obstructing contact between the battery’s terminal and Chromebook’s connector.
Use a can of compressed air to remove dust and debris from the Chromebook’s battery connector. Alternatively, use a clean cloth to wipe particles off the metal contacts that connect the battery to your Chromebook. You should also examine the battery physically and look out for swelling or bulging.
Subtle or noticeable swelling is a sign of a bad or degrading battery. If you notice any, contact the device’s manufacturer or visit a repair center to get the Chromebook’s battery replaced.
2. Charge the Chromebook Correctly
Your Chromebook won’t turn on if the battery is flat. That’s a no-brainer. If you drain a Chromebook’s battery to 0%, you might need to charge it for several minutes before it’ll come on. From research, plugging it into a power outlet for at least 30 minutes should supply enough charge to boot your device.
Nonetheless, note that plugging a “flat” or “dead” Chromebook into a power outlet isn’t enough to power it on. You need to make sure the power outlet is powered on and working correctly. Additionally, ensure the charging cable fits tightly in the charging port. Using compatible charging accessories, preferably those that shipped with your Chromebook out-of-the-box is also important. You can also try a different (but compatible) charger or AC adapter and see if it powers your Chromebook.
Not only will counterfeit accessories fail to charge your Chromebook, they can also damage the device’s battery. One more thing to check if your Chromebook is not turning on: ensure the charging cable is connected to the correct charging port. If your Chromebook has more than one port, plug the charging cable to the port designated for charging—lookout for the port with a LED indicator or a charging inscription.
3. Unplug External Devices and Accessories
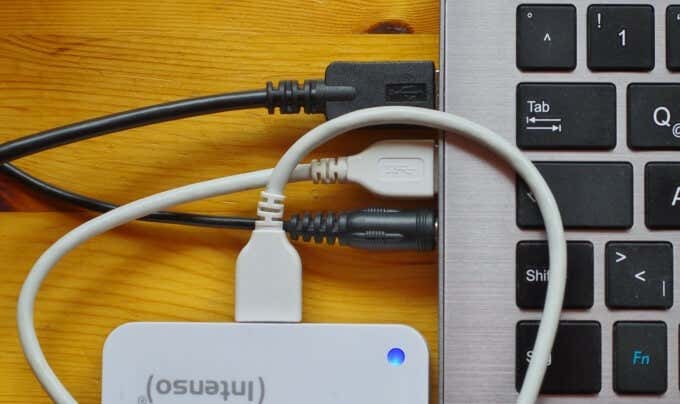
Many Chromebook manufacturers warn that some devices and accessories (e.g., headphones, USB storage devices, mice, etc.) can interrupt the ChromeOS boot process. If you have external devices plugged into your Chromebook’s USB ports or headphone jack, remove them and try turning on the device again.
4. Try a Hardware Reset
Your Chromebook won’t charge or turn on if some vital hardware components are failing or frozen. Other indications of hardware failure include a malfunctioning touchpad and an unresponsive keyboard. Google recommends performing a hardware reset only if other troubleshooting techniques prove abortive.
Unplug your Chromebook from the power outlet, remove any external devices, and press and hold the Refresh + Power keys on the keyboard. Release both keys when your Chromebook starts up—this might take at least 10 seconds.
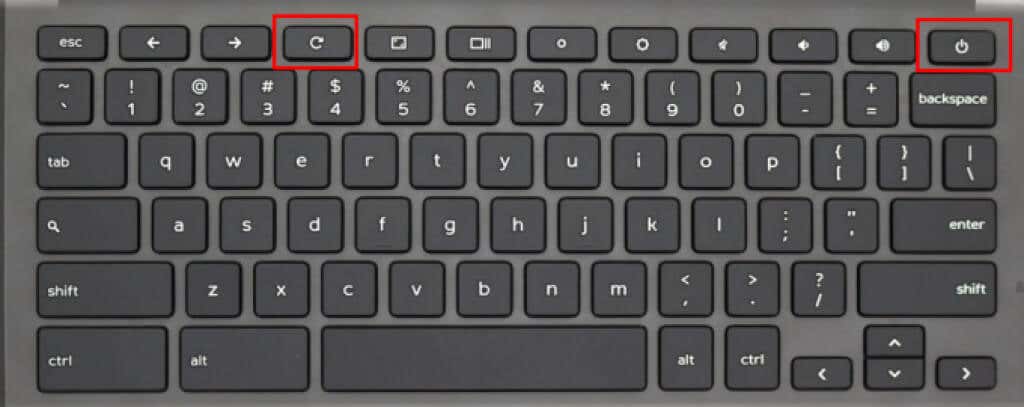
A hardware reset is also called an EC Reset because it refreshes the “Embedded Controller”—a hardware component that’s in charge of turning your Chromebook on and off. The operation might delete some files in the “Downloads” folder and reset the hardware components like the trackpad and keyboard configurations.
There are other ways to perform a hard reset. If your Chromebook has a dedicated Reset button, holding the button for a minute or more should unfreeze and reset your device. On some Chromebook models, you’ll find an “Emergency Reset Hole” that cuts power from the battery. Push a paper clip or SIM ejector pin in the hole, wait for about 5 seconds, and remove the clip/pin. Next, plug in the power adapter and press the power button to turn on your Chromebook.
Note: We recommend that you refer to your Chromebook’s instruction manual or visit the manufacturer’s website for detailed steps on performing a hard restart.
5. Contact the Device Manufacturer

If your Chromebook still isn’t turning on, report the situation to the device’s manufacturer. The device will be examined and repaired for free if it’s covered under a limited warranty. You might get a replacement Chromebook if the issue is due to a factory defect. Visit a nearby repair center if your device is no longer eligible for warranty coverage. Have the technician check for damage to your Chromebook’s battery or charging port.
Store Your Chromebook Correctly
A Chromebook’s batteries can lose charge—although slowly—even when they’re powered off. Make sure your Chromebook holds at least an 80% charge before storing it away for a long time. Anything below the recommended battery charge will drain (and possibly damage) the battery. Also, it may take a while before the Chromebook comes after a long storage period.
To prevent this from happening, Google recommends putting your Chromebook in a “Battery Disconnect State” before storing it away—even if the battery holds 80% charge or more. That will reduce the battery discharge rate to the barest minimum, keep the Chromebook in a stable mode, and prolong the Chromebook’s battery life.

Close all applications, plug your Chromebook into a power source and confirm that it is charging. Afterward, press and hold the Refresh and Power buttons simultaneously. Remove the charging cable while holding both keys and then release the keys. Your Chromebook will shut down and enter the “Battery Disconnect State.”
Chromebooks stored in this state won’t come on when you press the power button, even if the battery is charged. You’ll need to connect them to a power source to “wake” the battery before powering it on.
Subscribe on YouTube!
Did you enjoy this tip? If so, check out our YouTube channel from our sister site Online Tech Tips. We cover Windows, Mac, software and apps, and have a bunch of troubleshooting tips and how-to videos. Click the button below to subscribe!
Subscribe