Crucial to correct this problem quickly
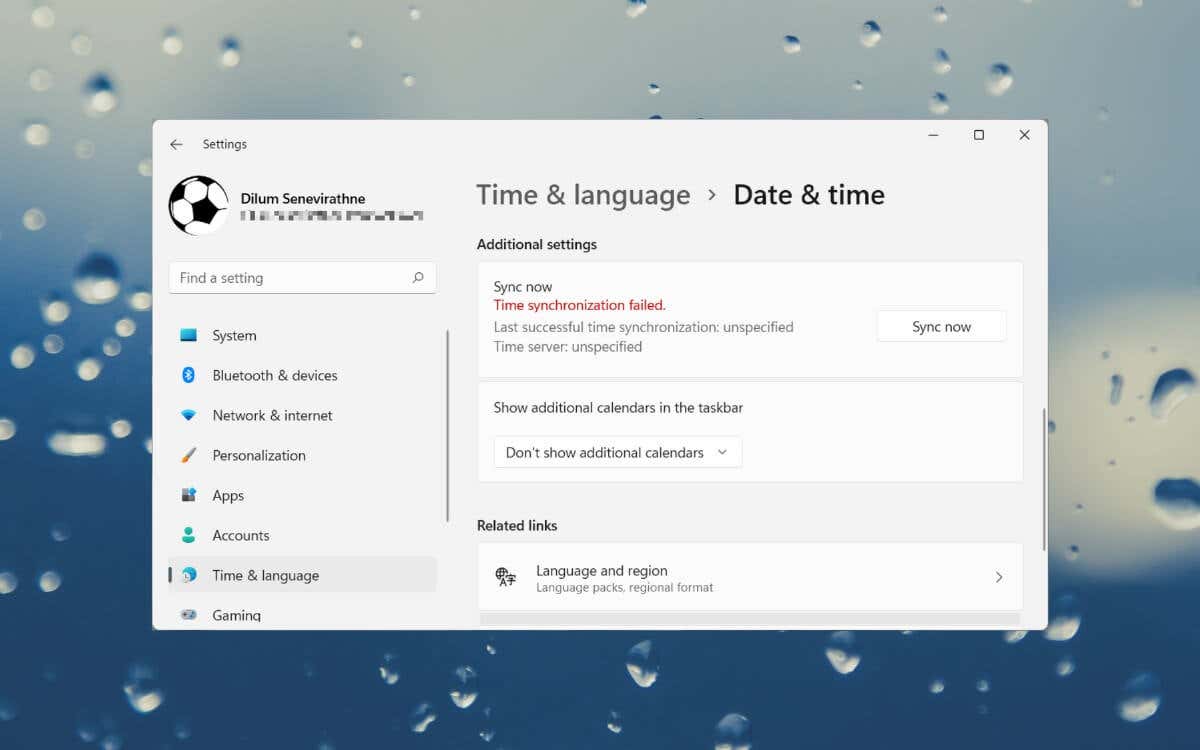
Do you keep receiving a “Time synchronization failed” error while syncing the clock with a time server in Windows 11 or 10? There are several reasons why that happens.
It could be a problem with the Windows Time service, an overloaded time server, or an issue with your internet connection. This troubleshooting guide will teach you multiple ways to fix that on a Windows computer.
Table of Contents
Restart the Windows Time Service
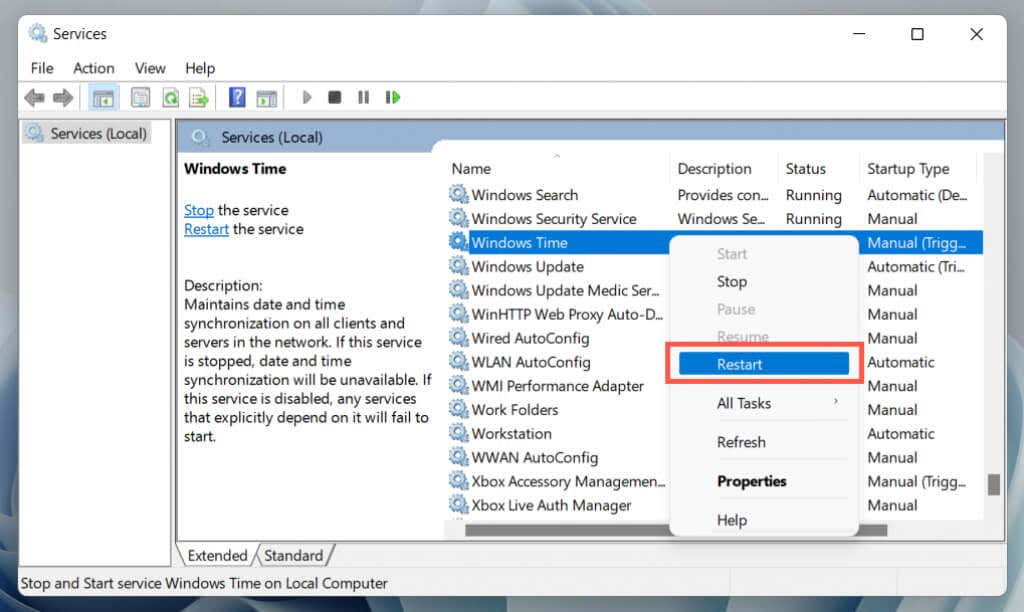
Windows Time is the background service that manages time synchronization in Windows operating systems. It’s susceptible to unexpected glitches, so restart it via the Services console and check if that helps.
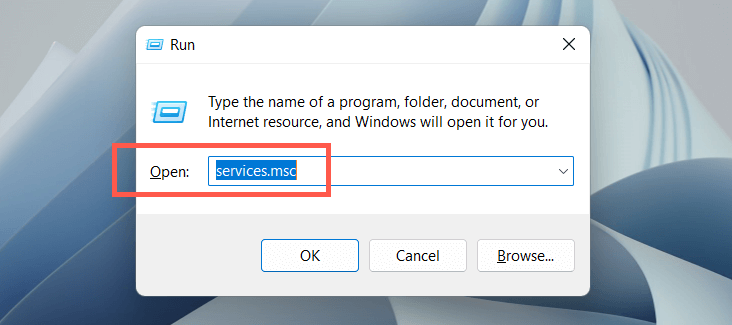
- Press the Windows + R keys to open Run.
- Type “services.msc” into the Open field and select OK.
- Right-click the Windows Time service and select Restart. If the context menu item appears grayed out, choose Start.
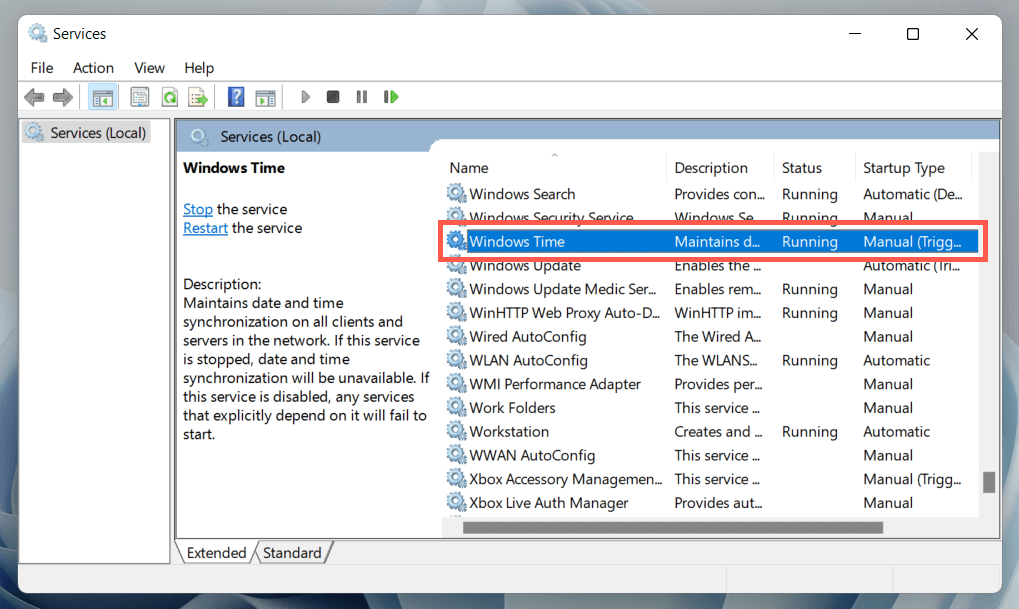
- Exit Services.
Modify the Windows Time Service Properties
If the “Time synchronization failed” error in Windows persists, make the following adjustments to the Windows Time service properties. To do that:
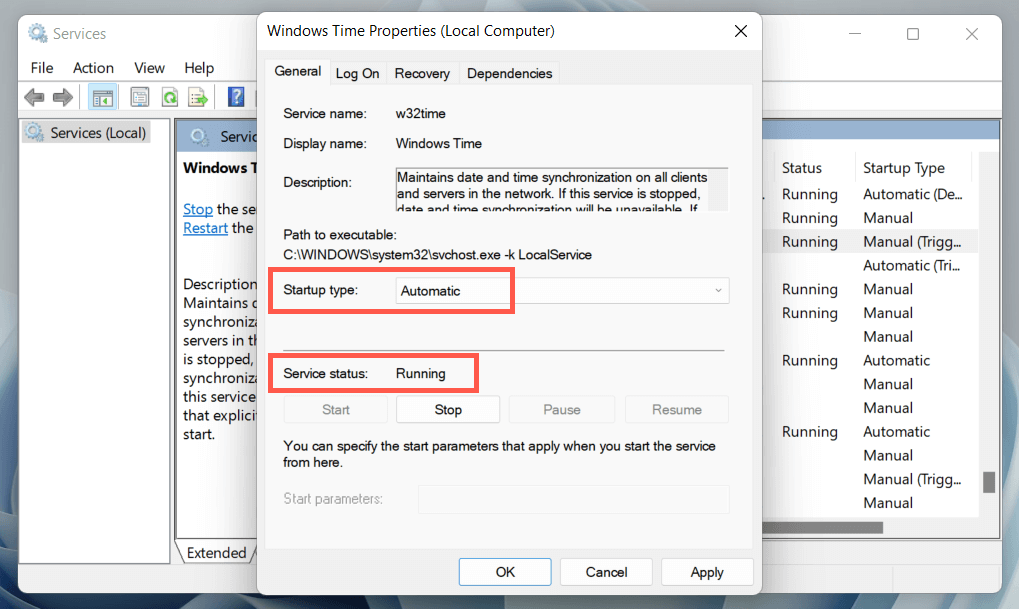
- Relaunch the Services console and double-click Windows Time.
- Set Startup type to Automatic. Set Service status to Running.
- Switch to the Log On tab.
- Select Local System account and the Allow service to interact with desktop option under it.
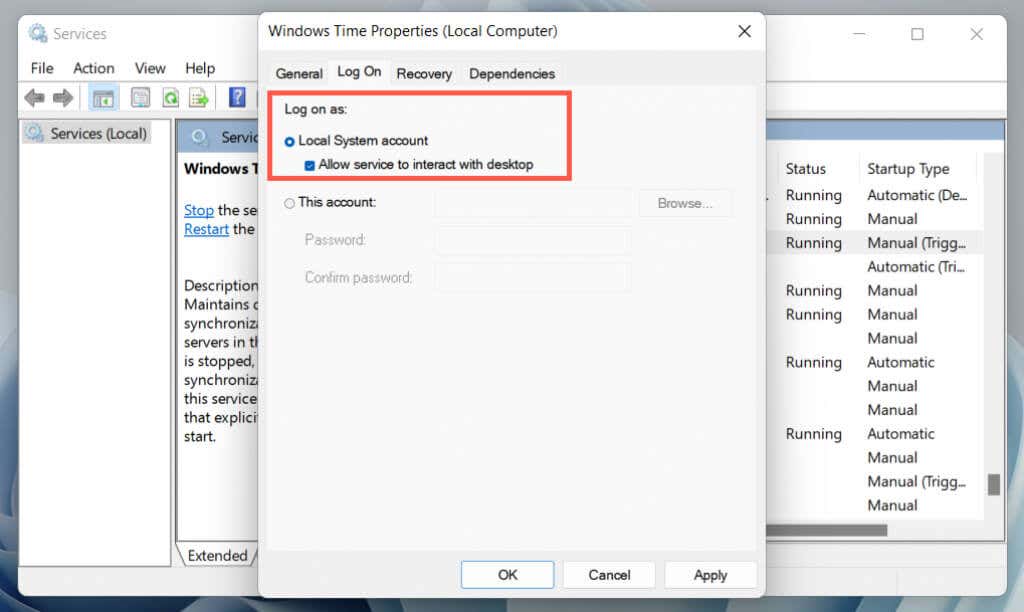
- Select Apply > OK and exit Services.
Toggle Automatic Time-Keeping On/Off
Disabling and re-enabling the automatic time-keeping functionality in Windows fixes time-syncing errors a lot of the time. To do that:
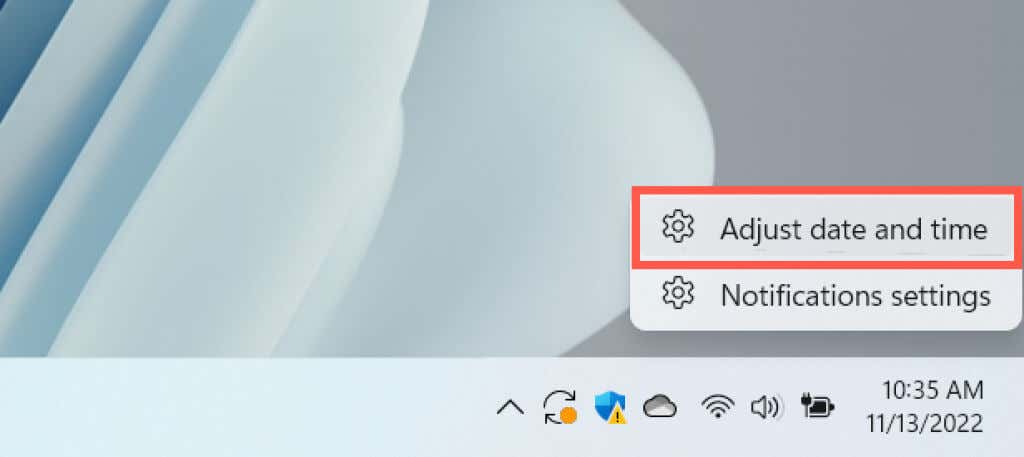
- Right-click the Clock on the right end of the taskbar and select Adjust date and time.
- Disable the toggles next to Set time automatically and Set time zone automatically.
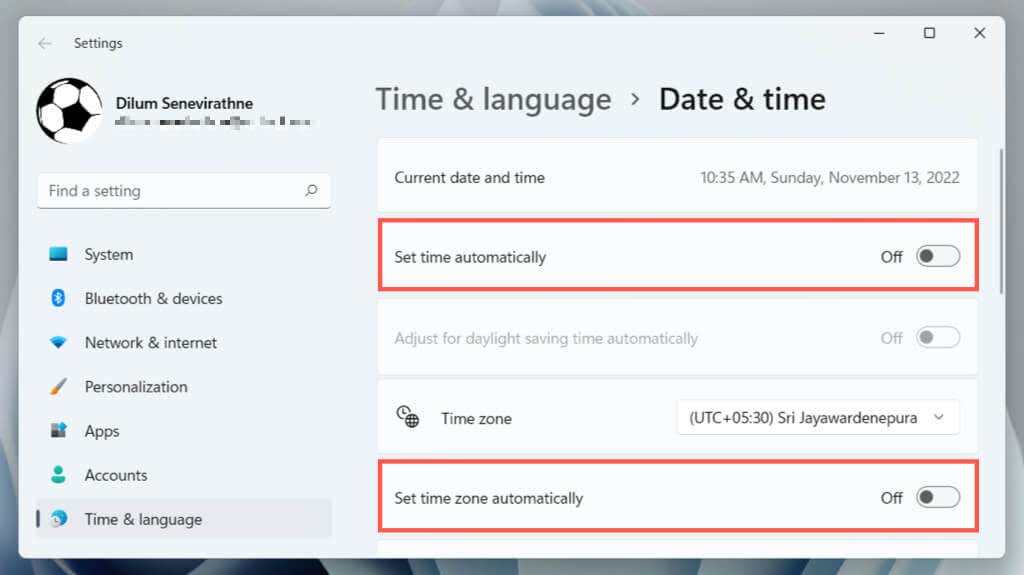
- Scroll down to the Additional settings section and select Sync now.
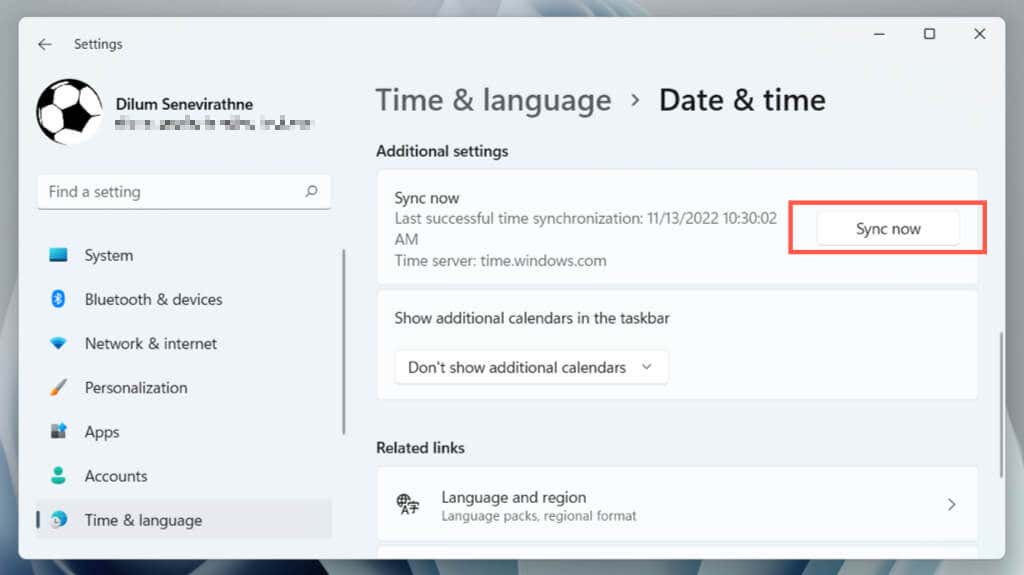
- Re-activate the Set time automatically and Set time zone automatically options.
Restart Your Computer
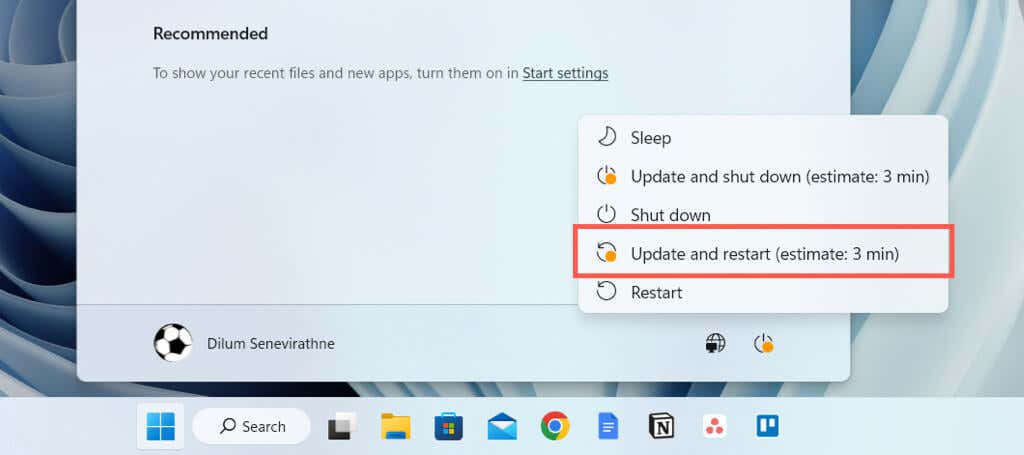
Core Windows functionalities malfunction if you don’t restart your computer often. If the “Time synchronization error” persists, open the Start menu and select Power > Restart. If you see an Update and restart option, choose that instead.
Troubleshoot Your Network Connection
If you see an extended error message reading something like “Time synchronization failed. Please check network connectivity and retry,” it’s likely something to do with your internet.
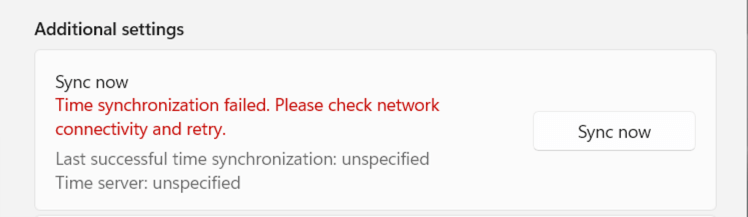
Here are several things you can try to fix the problem:
- Force the router to release and renew the IP address for your PC.
- Turn the router off and on. Or soft-reset the router.
- Flush the DNS (Domain Name System) cache in Windows.
- Connect to a different Wi-Fi network.
- Reset the network settings in Windows.
Pick a Different Time Server
By default, Windows 10 and 11 syncs with Microsoft’s time server at time.windows.com. Switching to the alternative time.nist.gov server could resolve the “Time synchronization failed” error. You must use the Control Panel‘s Date and Time applet for that.
- Type timedate.cpl into a Run box and press Enter.
- Switch to the Internet Time tab.
- Select Change settings.
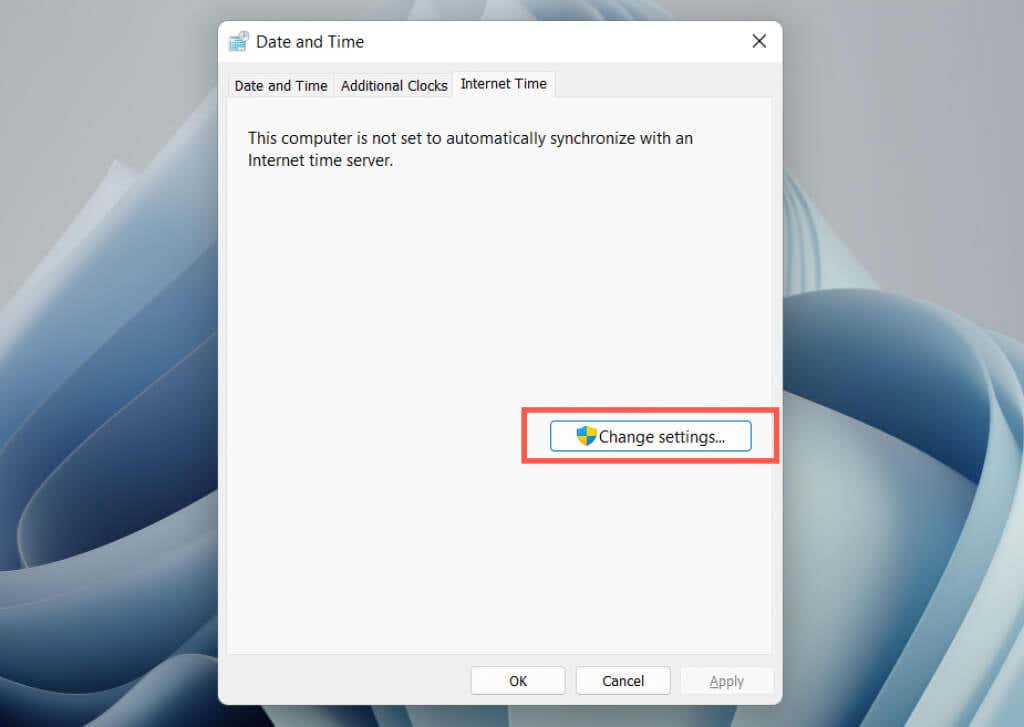
- Select Server and choose time.nist.gov. Enable Synchronize with an internet time server if the drop-down menu appears grayed out.
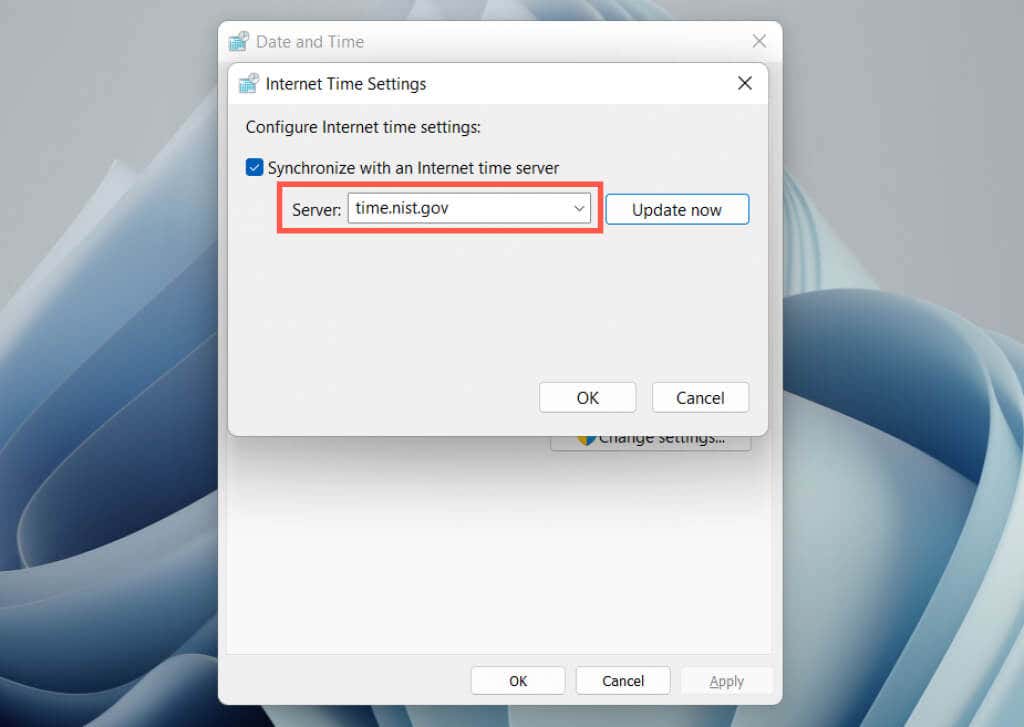
- Select Update now, and then OK.
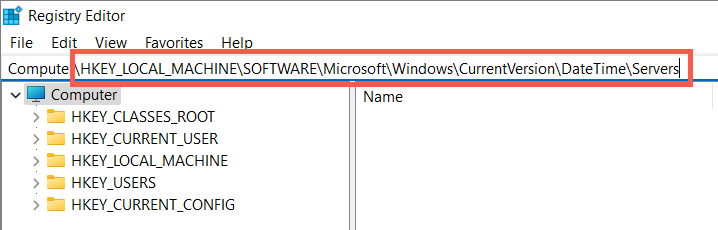
Add a Different Time Server
It’s possible to add additional time servers to Windows via the Registry Editor. Popular NTP (Network Time Protocol) servers include:
- time.google.com
- time.cloudflare.com
- ntp.gsu.edu
- pool.ntp.org
- isc.org
Back up the Windows system registry, and then:
- Type regedit into a Run box and select OK.
- Copy the following path into the address field at the top of the Registry Editor window and press Enter:
HKEY_LOCAL_MACHINE\SOFTWARE\Microsoft\Windows\CurrentVersion\DateTime\Servers
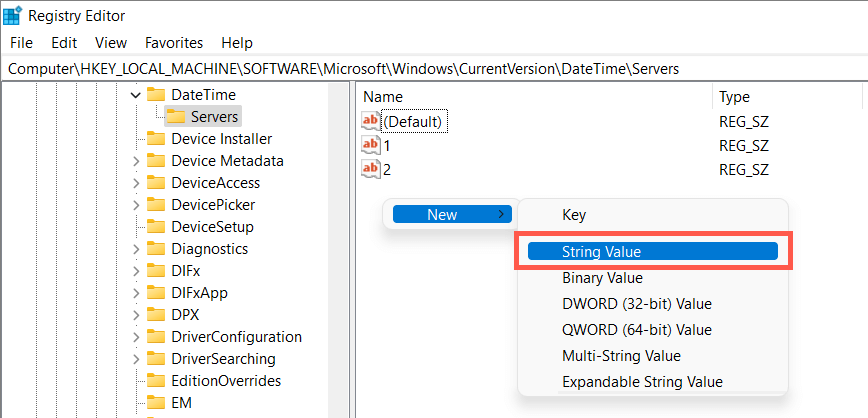
- Right-click an empty area on the right pane and select New > String Value.
- Name the string value as 3 (or 4, 5, and so on if there are more than two string values present by default).
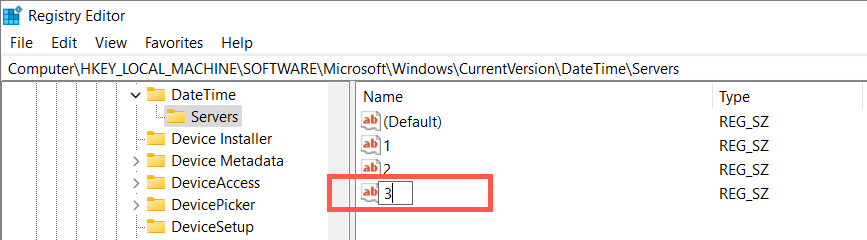
- Double-click the string value and enter a time server URL into the Value data field—e.g., time.google.com.
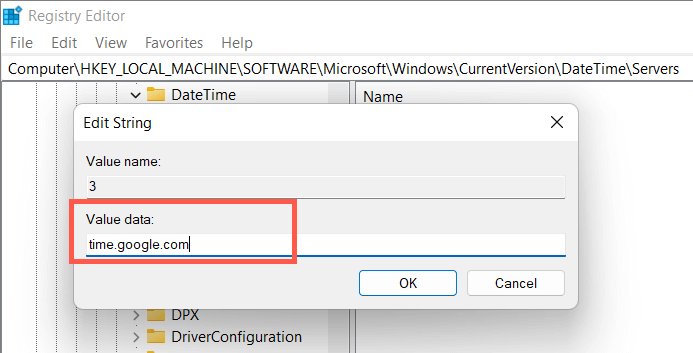
- Select OK.
- Exit the Registry Editor.
- Revisit the Internet Time settings (repeat the steps from the section above) and switch to the new time server.
Sync Time Through the Command Prompt
Next, unregister and re-register the Windows Time service, then sync the time via the Command Prompt console. To do that:
- Type “cmd” into the Windows Search box and select Run as administrator.

- Run the following commands one after the other:
- net stop w32time
- w32tm /unregister
- w32tm /register
- net start w32time
- w32tm /config /manualpeerlist:time.google.com /syncfromflags:manual /update
- w32tm /config /update
- w32tm /resync /rediscover
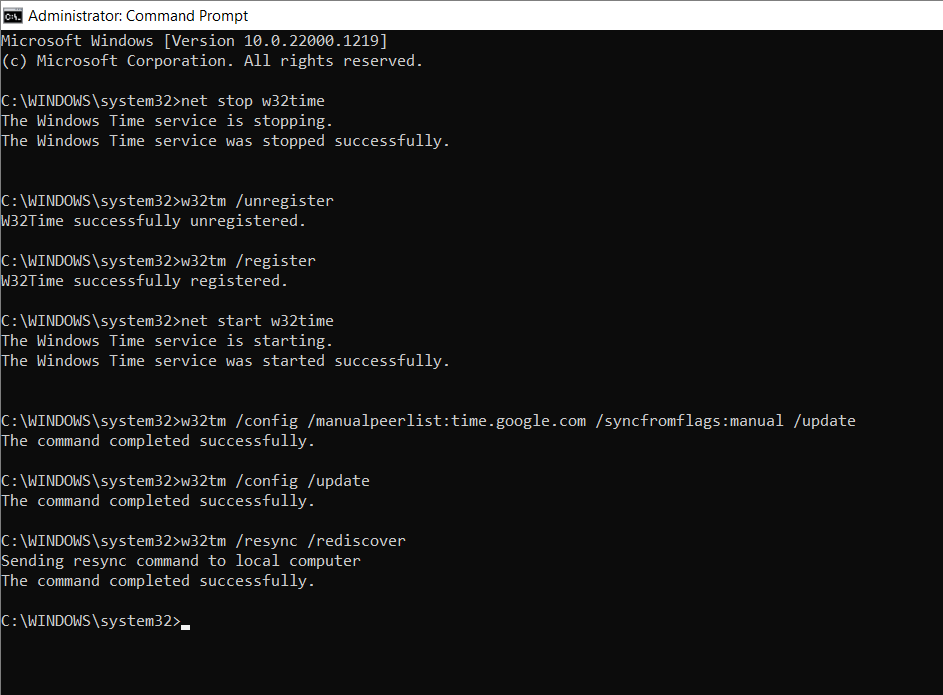
- Exit the Command Prompt console.
Allow Time Syncing on Firewall
If you use a third-party network firewall on your computer, uninstall it and switch back to the Windows Firewall or allow UDP port 123 (needed to sync the time). Refer to the firewall’s online documentation or FAQ on how to do that.
If the problem occurs over the Windows Firewall, here’s how to create inbound and outbound rules to ensure there are no network restrictions on the flow of NTP packets:
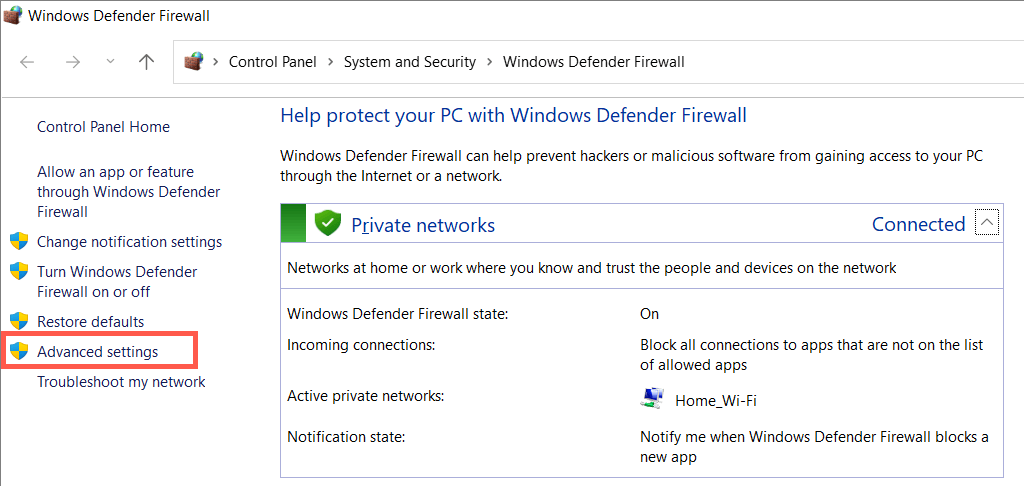
- Type firewall.cpl into a Run box and select OK.
- Select Advanced settings on the left menu.
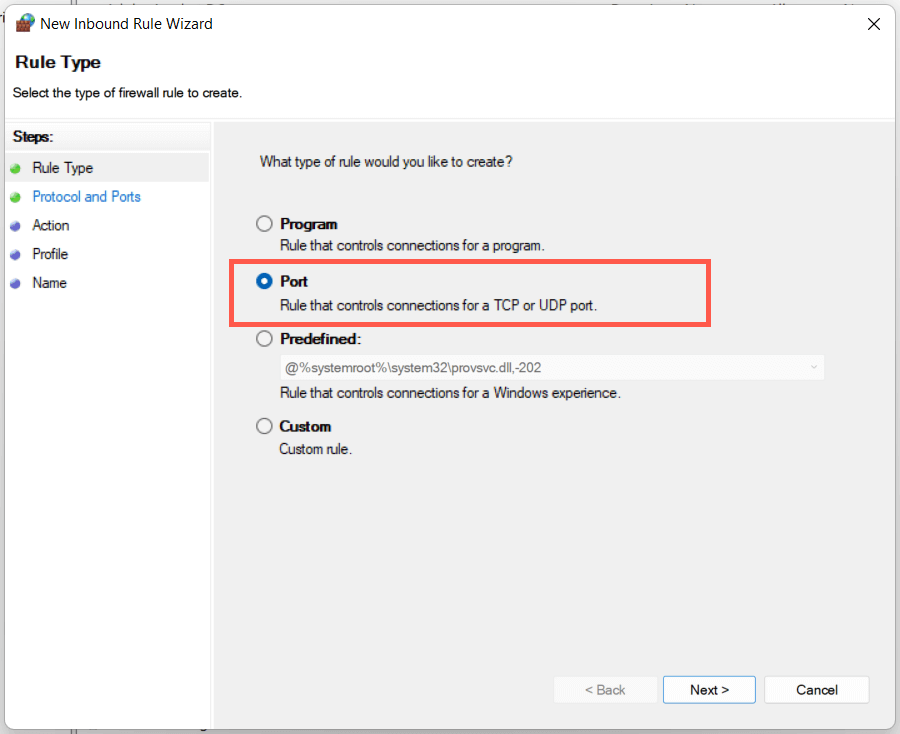
- Right-click Inbound rule on the left pane and select New Rule.
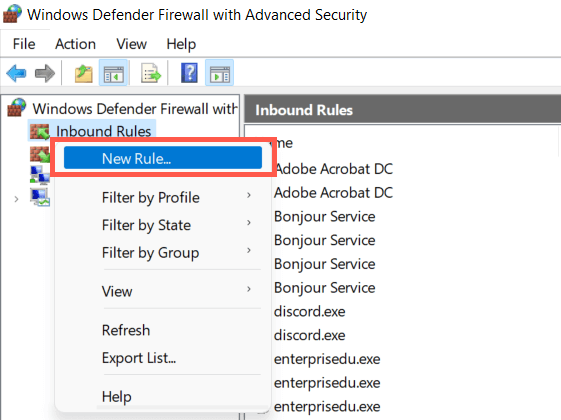
- Set Rule Type to Port and select Next.
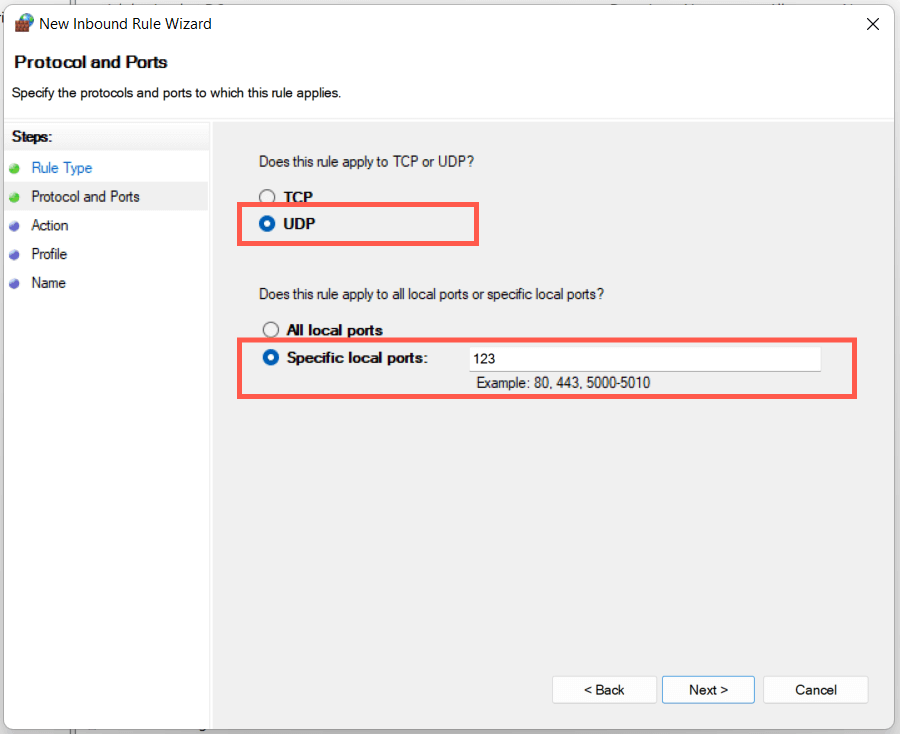
- Select UDP and set Specific local ports to 123. Select Next to continue.
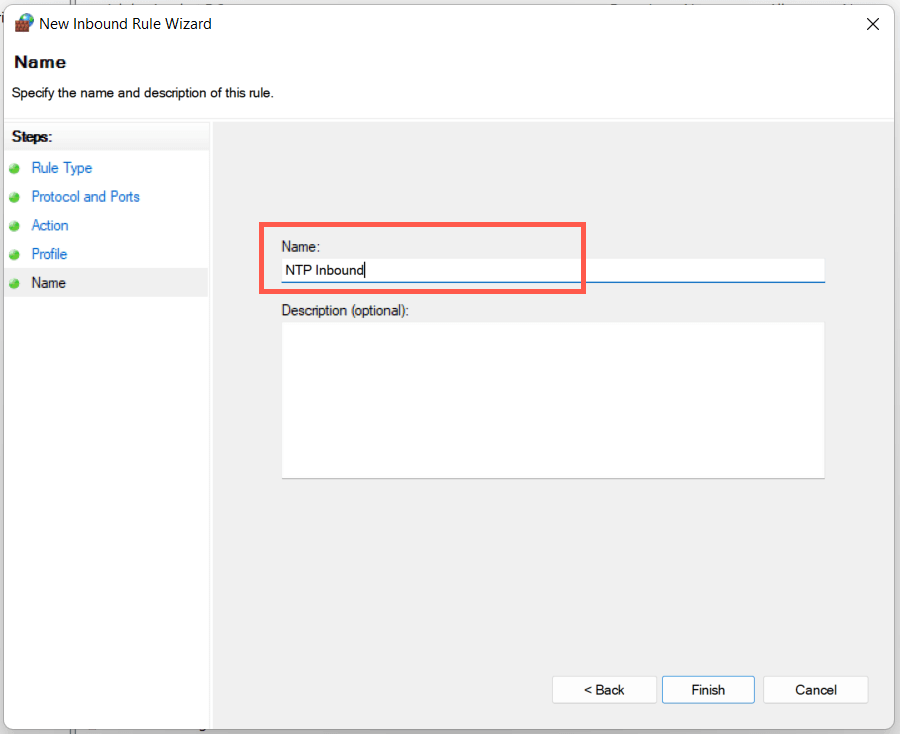
- Keep the default selections in the remaining steps and select Next. In the final screen, set a name (e.g., NTP Inbound), and select Finish.
- Right-click Outbound rule, select New rule and repeat steps 4-6 above.
Disable VPNs and Proxies
VPNs (virtual private networks) and proxy servers are another reason Windows could struggle to sync the time with a time server. Try disabling them.
- Open the Settings app in Windows and select Network & internet.
- Dive into the VPN and Proxy categories.
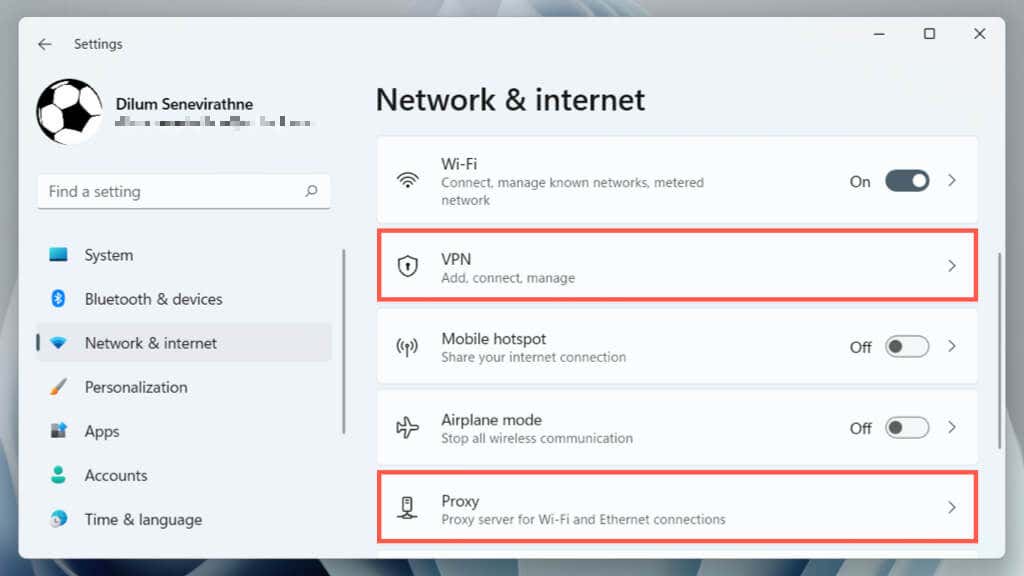
- Turn off any active VPNs and proxies.
Run an SFC Scan
Run the System File Checker (SFC) in Windows to fix time synchronization errors that stem from corrupt system files. To do that:
- Open an elevated Command Prompt console.
- Type sfc /scannow.

- Press Enter.
Scan for Malware On Your Computer
Malicious software often hijacks critical Windows features. If the “Time synchronization failed” error persists or you have trouble performing any of the fixes above, you must run a thorough scan for malware.
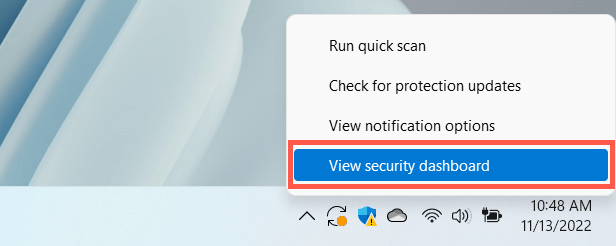
- Right-click Windows Security on the system tray and select View security dashboard.
- Select Virus & threat protection on the left menu.
- Select Scan options.
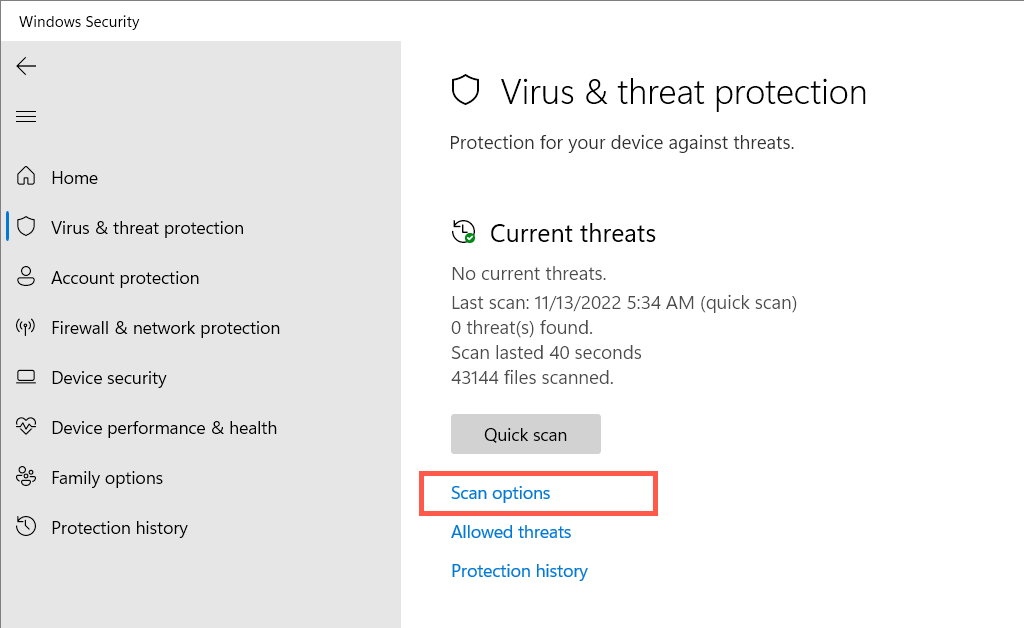
- Choose the Full scan option and select Scan Now.

It’s best to run an additional scan with a third-party malware removal utility. For example, the free version of Malwarebytes is more than adequate at detecting and removing stubborn malware.
Time Synchronization Is a Success
Fixing the “Time synchronization failed” error in Windows is crucial since an incorrect time often leads to complications with Windows Update and other network-reliant functionalities and programs. It also adversely impacts system security.
Just work your way through the fixes above, and you should be able to get rid of it. If the problem persists, consider resetting your Windows 11 or 10 installation to factory defaults.
Subscribe on YouTube!
Did you enjoy this tip? If so, check out our YouTube channel from our sister site Online Tech Tips. We cover Windows, Mac, software and apps, and have a bunch of troubleshooting tips and how-to videos. Click the button below to subscribe!
Subscribe