We go through every step possible
Have you noticed excessively high CPU usage because of the Adobe CEF Helper process in Windows 10 or 11? This tutorial explains what Adobe CEF Helper.exe is and how to reduce its impact on system resources.
What Is Adobe CEF Helper, and Why Does It Cause High CPU Usage?
Adobe CEF Helper is the background process that renders and manages the user interface of the Adobe Creative Cloud Desktop app. It handles the various components —like tabs and menus—separately, so it’s typical to see multiple instances of the same process. CEF stands for Chromium Embedded Framework, which means that the process uses a lot of live web content within the application.
Note: If you run an up-to-date version of the Creative Cloud Desktop app, the Adobe CEF Helper process may show up as “Creative Cloud UI Helper.”
Since Creative Cloud Desktop runs automatically at startup, it’s normal for Adobe CEF Helper to show up within the Windows Task Manager. It’s also common for CPU usage to spike when Creative Cloud Desktop runs an active task, like installing an Adobe application or syncing a file with Adobe Creative Cloud. The same applies to other Adobe processes—e.g., CCXProcess, CCLibrary, and AdobeIPCBroker.
However, persistently high CPU resource usage by Adobe CEF Helper could indicate a problem, such as a technical glitch within the Creative Cloud app, conflicts with other programs, system-related stability issues, etc. High memory usage, screen freezes, and application crashes are other symptoms to deal with when that happens, including errors like “Adobe CEF Helper has stopped working error.”
On a more dangerous note, a resource-intensive Adobe CEF Helper might indicate the presence of malware, especially if you don’t have Adobe products—or a history of using them—on your computer. In that case, we recommend you immediately use Windows Security or a third-party antivirus program to perform a thorough scan for harmful software.
What You Can Do to Fix Adobe CEF Helper High CPU Usage
If Adobe CEF Helper uses lots of CPU and memory or Creative Cloud Desktop freezes and crashes in Windows 10 or 11, work through the troubleshooting instructions below to get it back under control.
Force-Quit and Relaunch Creative Cloud
Force-quitting and relaunching the Creative Cloud Desktop app is the simplest way to eliminate unexpected problems with the processes that make it work. Save your work in all open Adobe applications and exit them. Then use the following steps:
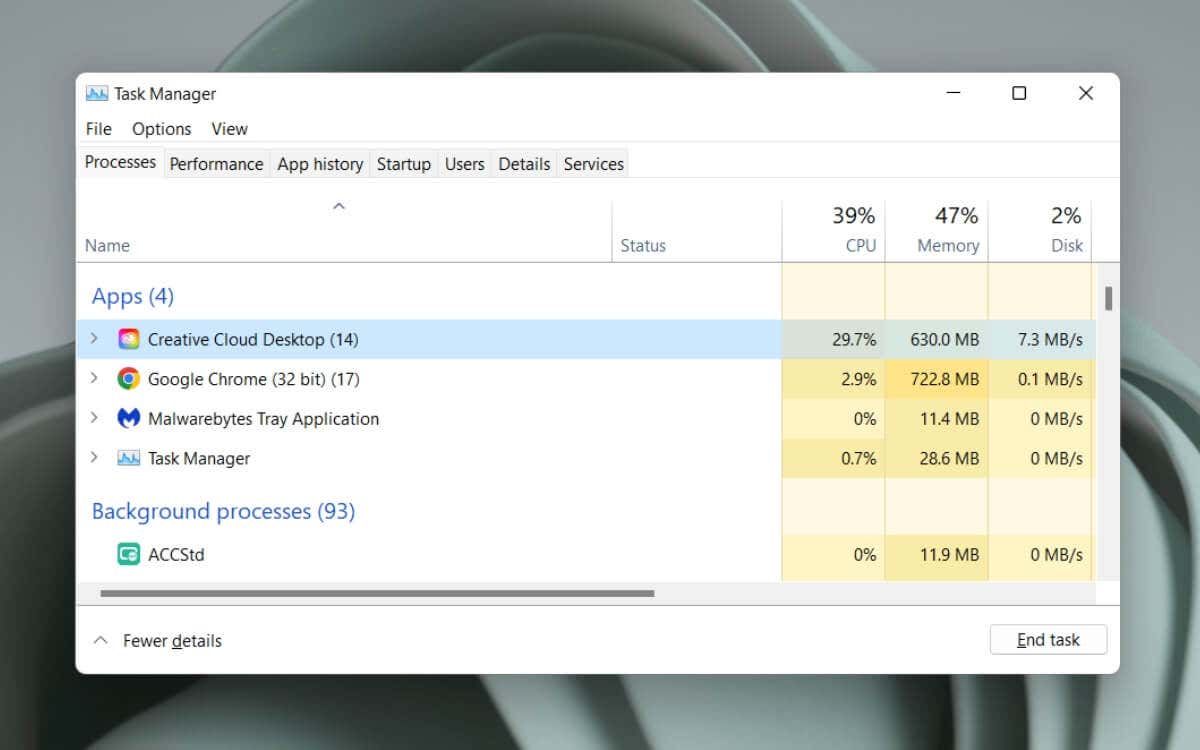
- Press Ctrl + Shift + Esc to open the Task Manager.
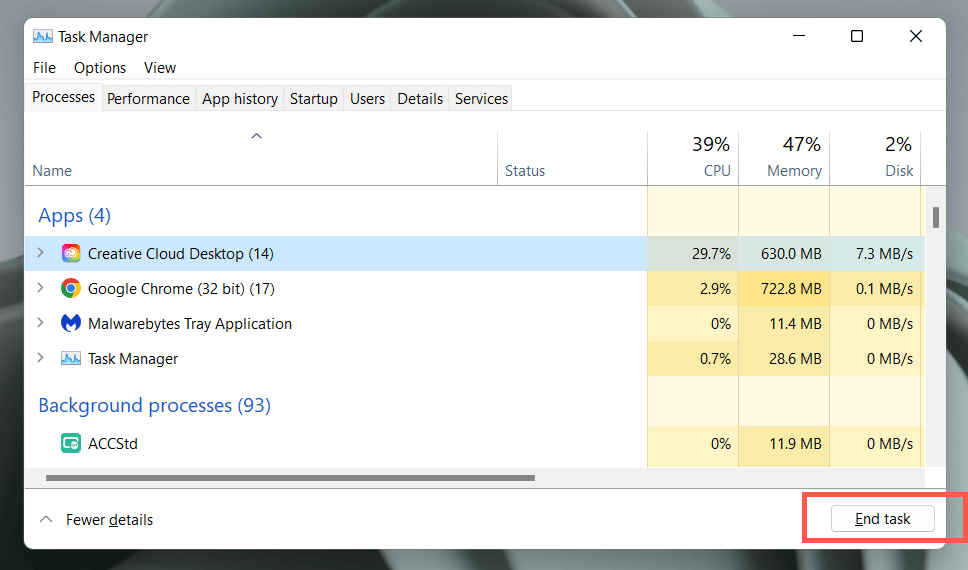
- Select Creative Cloud Desktop under the Processes tab.
- Select End task.
- Repeat for other Adobe-related processes further down the list—e.g., Adobe Update Service, Adobe Genuine Service, etc.
- Open the Start menu and select Adobe Creative Cloud to reopen the application.
If that does not help, we recommend restarting your computer. Just open the Start menu and select Power > Restart.
Update Creative Cloud Desktop and Other Adobe Apps
Creative Cloud Desktop updates enhance the stability and performance of the application. Try checking for and installing them next.
- Open Creative Cloud Desktop.
- Select the Menu icon (three stacked lines) on the top left of the window.
- Point to Help and select Check for Updates. If there are new updates, the Creative Cloud Desktop app should automatically install them.
Additionally, update all your Adobe Creative Cloud applications—Acrobat, Photoshop, InDesign, etc.—to their latest versions. To do that:
- Switch to the Apps tab in Creative Cloud Desktop.
- Select the Updates button on the left navigation pane.
- Select Update next to each Adobe software product with a new update.
Disable Auto Updates in Creative Cloud
If Creative Cloud Desktop is set to update itself or the Adobe apps on your computer automatically, the Adobe CEF Helper process could get stuck checking for newer software versions and consequently use a lot of CPU. Disable automatic updates to fix that:
- Open the Creative Cloud Desktop app.
- Select your Adobe account’s profile icon on the top right of the window.
- Select Preferences.
- Turn off the switch next to Always keep Creative Cloud up to date.
- Select Apps on the left menu.
- Turn off the switch next to Auto-update.
Pause and Resume Adobe File Sync
Adobe CEF Helper consumes additional CPU resources if Creative Cloud Desktop struggles to sync files between your computer and the Adobe Creative Cloud. Briefly pause file syncing, and the problem will likely go away.
- Select the Cloud icon on the top right of the screen.
- Select the Pause button.
- Wait 30 seconds and select Resume.
Run an SFC Scan
Missing or corrupt system files in Windows are other reasons that various third-party processes malfunction. Use the System File Checker (SFC) to restore operating system integrity. You can run it via an elevated Command Prompt console.
- Type cmd into the Start menu’s search bar and select Run as administrator.
- Type the following command and press Enter:
sfc /scannow
You can also follow up by running an additional scan with the DISM (Deployment Image Servicing and Management) tool.
Install New Windows Updates
Newer Windows updates come with performance enhancements that improve how programs like Creative Cloud Desktop run on your computer. Run Windows Update to rule out high Adobe CEF Helper CPU usage issues that stem from an out-of-date version of the operating system.
- Right-click the Start button and select Settings.
- Select Windows Update.
- Select Check for updates, and then select Download and install if there’s a pending update.
Check for Antivirus Interference
Antivirus software can interfere with how Creative Cloud Desktop works, causing high CPU usage with the Adobe CEF Helper process.
If you have an antimalware utility installed on your computer, just right-click the program’s icon on the left corner of the taskbar and pause protection. If that helps, add Creative Cloud Desktop to the program’s exceptions list. Refer to its online documentation for the specifics.
Clean Boot the Operating System
Adobe CEF Helper’s CPU usage can escalate due to conflicts with other third-party apps and services. To confirm, try clean booting Windows.
- Ctrl + Shift + Esc to open the Task Manager.
- Switch to the Startup tab and disable all non-Microsoft startup apps. Do not disable Creative Cloud Desktop.
- Press Windows + R, type msconfig, and press Enter to open the System Configuration console.
- Select Hide all Microsoft services and choose Disable all.
- Restart your computer.
If that fixes Adobe CEF Helper, re-activate the apps and services in batches. Once you isolate the conflicting item, update the related program or keep it disabled. Learn more about performing a clean boot in Windows.
Reinstall Creative Cloud Desktop
Next, repair or reinstall Creative Cloud Desktop to resolve potential corruption issues with program files. To do that:
- Download the Creative Cloud Uninstaller from the Adobe website.
- Run the executable file.
- Select Repair. If that does not help, select Uninstall and then download and reinstall the latest version of Creative Cloud Desktop.
Contact Adobe Support
If none of the fixes above help and the Adobe CEF Helper process continues to cause extreme CPU usage issues, contact Adobe Support, and they should be able to walk you through additional fixes for your computer setup. Deploy antivirus software if you don’t use any Adobe products.


